Problem Set 4: Finalising your Game
| Issue date | Monday, 16 February 2026 |
| Due date | Sunday, 1 March 2026 |
| Total points | 130 points |
- Please read the entire problem set before starting!
- Start early, so that you can create a great game / enjoy your recess week :]
Introduction
In this problem set, we will integrate the two parts that we have built in the previous two problem sets to form a complete game. We will also add more things on top of it, and you can also add your own ideas, to make your own cool game!
This means that while you have some requirements that you need to fulfill, the rest is up to you.
What is YOUR game gonna be?
Unlike your previous problem sets, the grading of the assignment is divided into two components: satisfying the technical requirements (70%) and "coolness" factor (30%). Before you get too stressed out, note that satisfying the technical requirements is well sufficient for you to get a solid A grade in CS3217. The 30% "coolness" factor element in this problem set is designed to provide you with the chance to show off your creativity and earn an A+ grade.
You only need to create a game that satisfies these requirements:
- It involves a Level Designer, complete with saving and loading of multiple levels, just like in PS2.
- It involves the core Peggle gameplay, which is a game engine that can shoot balls, collide with pegs, and remove them once the ball is outside the screen, just like in PS3.
- It involves additional gameplay elements as described in this problem set (parts 2 to 11).
- There is a complete game flow so that players can transition from creating levels to playing them (part 12).
As long as your game satisfies the above requirements, you are free to do pretty much anything you want. For example, you are free to replace the background and provided images, if you desire. In the past, people have made themes like Pokémon, Naruto, and other obscure anime that the author do not recognise.
You are required to provide some sort of manual in the README that explains the rules of the game. The purpose of this manual is to let players of your game (including your grader) understand your game and differentiate between features and bugs :]
Unlike in Problem Set 3 where we do not double-penalise for issues penalised in Problem Set 2, we will penalise for issues penalised in Problem Set 2 if they persist in this problem set's submission. Since you'll be integrating your work from Problem Set 2 in this problem set, it is your chance to make this the best software yet!
No External Libraries
Just like PS2 and PS3, external libraries are still not allowed, with the exception of SQLite.swift for persistence if you used it in PS2.
The first-party libraries SpriteKit, UIKit Dynamics, and GameplayKit are also not allowed. Before attempting to use any non-standard libraries, it is always a good idea to clarify with the course facilitators.
Generally, you would not even need any funky libraries to complete this PS. All of the extensions and integrations should concern the architecture that you have built in PS2 and PS3.
Part 1: Developer Guide (10 points)
Similar to the previous problem sets, please come up with a developer guide. This time, you do not need to come up with scenarios where you make a trade-off. For more information, please refer to PS2.
It is likely that you can copy-paste almost everything from the previous developer guides you have created. Feel free to do so.
Part 2: Cannon (4 points)
You are given a cannon spritesheet (which was also provided in the previous problem set). Please use the provided spritesheet to show a cannon in the game. The player should be able to aim the cannon somehow, and the ball should fire in the direction of the cannon.
Note that you do not need to handle collision between the ball and the cannon. You can treat the cannon as an object that the ball can phase through.
Please explain how one aims the cannon in the rules of the game.
Part 3: The Bucket (4 points)
You are given a bucket sprite as part of your assets. You must use the bucket as follows:
- The bucket should be at the bottom of the screen.
- The bucket should move left and right in a deterministic way.
- There should be a special effect in the game once the ball enters the bucket.
In the original Peggle game, when the ball enters the bucket, you earn a free ball and the number of balls get incremented. Again, you are allowed to change this effect if you wish, as long as there is still something happening when the ball enters the bucket. Please write this effect in the rules of the game as well.
In addition, you should handle collision between the ball and the bucket. Please be reminded that you only need to create a visible and realistic collision. You do not need to have a perfect simulation.
Part 4: Win and Lose Conditions (4 points)
You cannot really call something a game without some way of winning or losing. Please come up with some way of winning, as well as some way of losing. Do make it apparent to the user if he/she wins/loses the game, e.g. by showing "YOU WIN" and "GAME OVER" screens.
In addition, when a game is being played, the game must somehow be able to terminate to a win or lose state. In other words, the game should not be able to get stuck (e.g. when a ball is trapped) with no way to reach the win or lose conditions. Note that the requirement in PS3 still stands: you cannot remove pegs prematurely except to unstuck the ball.
In your README, please explain the winning and losing conditions, as well as measures you are taking to fulfil the requirement above, in the rules of the game section.
Here are the winning/losing conditions from the original Peggle game. You are allowed to come up with other conditions for your game, as long as there exists one.
- To win, clear all orange pegs.
- You start with 10 balls. Every time you shoot a ball, the number of balls get subtracted. You lose if you run out of balls and there are still orange pegs remaining in the game.
Part 5: Power-ups (16 points)
One of the cool things about the original Peggle game is the existence of power-ups that help you clear many pegs and score big! You are given green pegs in the assets. Once the ball hits a green peg, a power-up should activate. At the bare minimum, please implement these 2 power-ups: Ka-Boom and Spooky Ball.
How the game decides which power-up to activate is up to you; the only requirement is that there should be a way for players to try out certain power-ups (so that your grader can test your implementations). For example, having the power-ups chosen randomly at all times is not acceptable.
In the original Peggle game, the player can choose a "master" before playing the game. The master dictates what power-up activates when the ball hits a green peg.
Feel free to rename the power-ups if you wish as well!
Ka-Boom (8 points)
When the Ka-Boom power-up activates, the green peg explodes, destroying other pegs close to it. Any other green peg being destroyed in the blast also explodes, possibly setting off a chain reaction. The explosion(s) should exert a force on the ball, knocking it off its original trajectory.
Spooky Ball (8 points)
When the Spooky Ball power-up activates, the ball becomes a "spooky ball". When the ball goes below the gameplay area, it reappears at the top of the gameplay area at the same x-axis position. See this video for more information:
How this power-up interacts with the bucket is up to you. In the original game, the bucket is closed while this power-up is active.
Part 6: Rectangular Blocks (4 points) 🔥
Your game should support rectangular blocks in the playing field. These blocks are not pegs. They are simply obstacles which the ball should just bounce off in a realistic manner.
A level should be able to contain both pegs and blocks; you may not restrict the user to only put in pegs or blocks. How the palette should include this block is left for you to decide.
Part 7: Rotatable Pegs/Blocks (4 points)
Pegs and blocks should be able to be placed in any orientation. That is, they should be rotatable in the Level Designer. The interface for rotation is left to you. Please explain in the README how the user can rotate the pegs and blocks.
Note that the pegs/blocks should be able to be rotated to any angle. For example, only supporting rotation of pegs to multiples of 90 degrees is not allowed.
A rookie fallacy is assuming that rotations of circles are pointless because they are still circles. This is not true! While the geometric representation of a rotated peg is still the same circle, its image will look different due to the rotation. Please implement the true rotation of pegs and blocks.
Part 8: Resizable Pegs/Blocks (4 points)
Please support changing the size of the pegs and blocks. In the Level Designer, there should be some way to resize them. The UI for resizing pegs is left to you. Please explain in the README on how the user can do this.
You may impose both a minimum and a maximum size. However, the maximum size (if it exists) should be at least 4 times the size of the minimum size (if it exists) in area (i.e. 2 times the radius).
For both rotation and resizing, the same rules of no overlapping pegs/blocks at any time still apply. One should be able to place, rotate, and resize pegs/blocks as long as they are not superimposed with others at any time, including when the user's finger is still on the screen.
Parts 9–10: Oscillating Pegs/Blocks (16 points) 🔥
Pegs and blocks can now be allowed to move along a straight path during the game. A peg/block should move along its path in a simple harmonic motion, i.e., its position in time follows a sinusoidal function. See these videos for more information:
The user should be able to specify in the Level Designer: the motion path, starting position, and speed of a moving peg/block. To adjust the starting position and length of the motion path, green and red handles will be displayed when the peg/block is selected in the level designer.

The initial direction of motion follows the green line. The length of both lines can be adjusted by dragging the handles, and the colors may be flipped by dragging across to the opposite side.
The angle of the path follows the orientation of the peg/block.
It is left to you to decide how the duration of one period (i.e., how fast the object moves) should be adjusted in the Level Designer. Please explain in the README on how the user can do this.
For simplicity, while objects in the Level Designer should not overlap with each other, moving objects in the game will not collide with each other, and simply pass through.
A level should be able to have both static and moving pegs/blocks.
Part 11: Preloaded Levels (8 points)
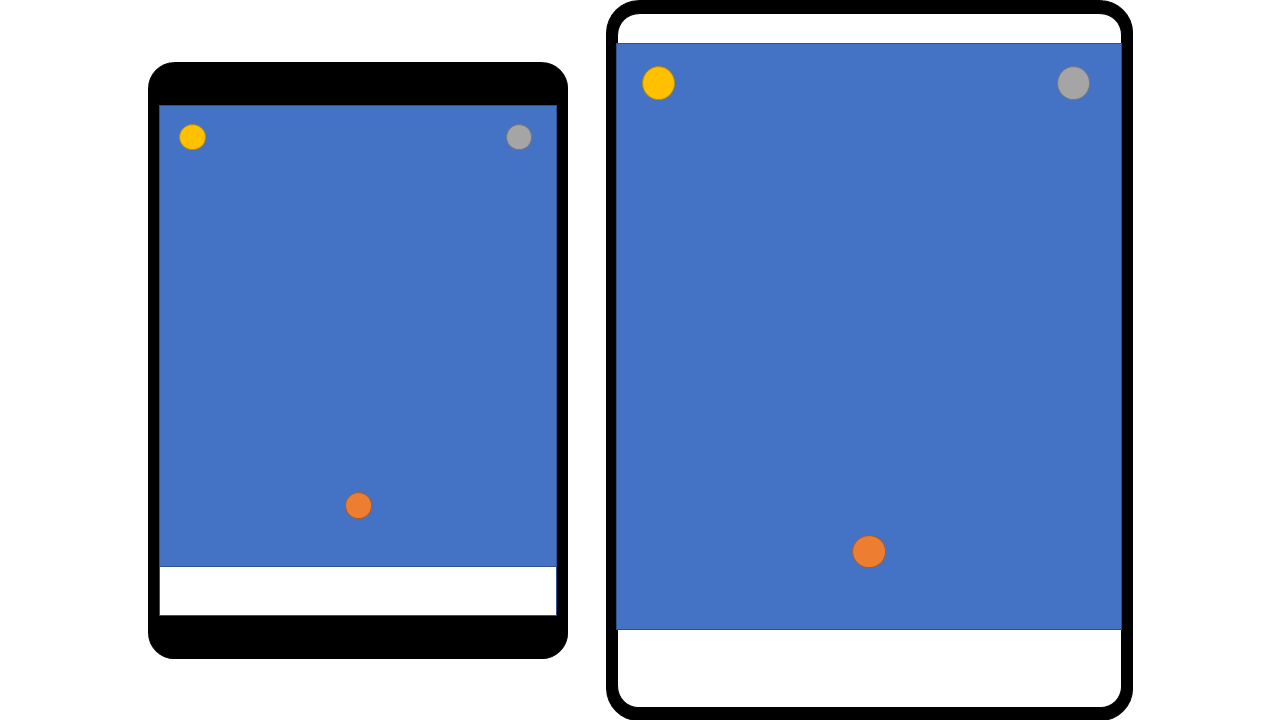
Please provide at least 3 preloaded levels for the user to be able to play directly without designing any levels. These levels (including their pegs) should be completely independent of iPad screen sizes, i.e. they should be scaled and positioned in exactly the same way no matter what iPad the user is using.
For example, if I have a level in which pegs are located at all four corners of the board, opening the level in all iPad sizes should display the pegs at those corners. In order to make the game experience the same across all screen sizes, your game board should be letterboxed appropriately, i.e. the board should be expanded such that either the top and bottom or sides fill the screen.
Levels that do not scroll on one iPad should not scroll on iPads of other screen sizes.
In addition, the player should be able to load any of these preloaded levels into the Level Designer and modify them, saving as a new level. The player should not be able to override the preloaded levels.
Part 12: Integration (4 points)
Now, we have an awesome game! We just need to integrate it with the level designer and a proper interface.
Connect all the parts by providing these functionalities:
- When the player presses START at the Level Designer, the player should be able to play the level that is designed.
- Provide a menu screen as the entry point of the application. The player should
be able to go from the menu to:
- The Level Designer screen, to design levels as in PS2.
- The level selection screen, described below.
- Provide a level selection screen that shows the levels that the players have already saved. The player should be able to select a level to play.
- Provide a way to return to the main menu.
Part 13: Bells and Whistles (40 points)
Here is the time for you to shine! With a good design and good implementation of the previous problem sets, you should be able to add many functionalities without much effort.
The points in this part will be awarded according to the following criteria:
- How awesome a feature is
- How large an engineering effort is needed to implement a feature
- The general feeling/theme of the game, with all features considered together (e.g. Pokémon theme, Naruto theme)
Here are some small ideas that should hopefully not take too much effort and can earn you some easy points:
- A score system that is calculated based on how many pegs you hit and other factors
- Sound and music
- Displaying the number of pegs / orange pegs remaining
- Displaying the number of pegs / orange pegs placed in the Level Designer
- A timer that results in a game over when it ends
Here are some more ambitious ideas that can make your app much cooler:
- Additional types of power-ups
- Style shots that give you extra score when executed (e.g. clearing at least 10 orange pegs in one shot)
- Displaying ball trajectory when aiming the cannon
- Wind effects
- Level Designer features, such as zooming, snapping, selecting more than one pegs with rectangular select
- Multiplayer mode
- Engineering luck
Please describe all the extra features and improvements in the README, so that your graders can award you due credit. Any feature not described will not be given credit, or worse, be mistaken as a bug.
As part of the assets in this problem set, we have provided you extra peg colors that you may use for your liking. Once again, the author wishes to thank Lim Hui Qi for providing the assets and extra assets :]
We have also written the rules of the original Peggle game in the appendix, for you to take inspiration.
If you choose to add custom assets, be sure to adhere to the licensing conditions and attribute them where appropriate (possibly in your README).
Part 14: Testing (8 points)
Similar to the previous problem sets, please write some tests / test plans to ensure the correctness of your code. For more information, please refer to Problem Set 2.
Note that extra features listed in the bells and whistles section do not need to be tested. We still recommend you to test them to ensure that your cool features are bug-free; we might nullify points for buggy bells and whistles.
Feel free to copy-paste from your tests in the previous problem sets, if necessary.
Part 15: Reflecting on your Design (4 points)
Please fill in this part only after you have finished implementing everything.
Now that you have integrated your work for problem sets 2 and 3 and combined them into one game, comment on your architecture in those problem sets. Here are some guiding questions, though please feel free to reflect on your design more if you wish:
- Do you think you have designed your code in the previous problem sets well enough?
- Is there any technical debt that you need to clean up in this problem set?
- If you were to redo the entire application, is there anything you would have done differently?
This is not the same as the bonus reflection form. This is a required part of the problem set, and talks about your design and architecture from Problem Set 2 to your final software in this problem set.
Late Submission
If you will be submitting/have submitted late for this problem set, please fill up this form so that the latest commit will be graded instead of the last commit that was pushed before the deadline.
Bonus: Reflection (3 points)
Answer the reflection questions in this form for 3 bonus points!
Appendix: Rules of Peggle
This section is for your information only, for inspiration when you want to implement certain bells and whistles. It is not necessary to implement anything here that is not covered above.
General
In each level, there are pegs of various colors. There is always exactly 25 orange pegs (to be cleared), 2 green pegs (for power-ups), and 1 purple peg (for a score boost); the rest are blue pegs.
The player starts with 10 balls, and the objective of the game is to clear all orange pegs before the balls run out. If the balls all run out, the player loses the game.
The game is played by shooting a ball to the arena. The player controls the cannon by panning in the area; the cannon will point to the location of the touch. The player can then tap the screen to shoot the ball in that direction. The ball will then fall down, hitting some pegs. These pegs will light up once hit. Once the ball exits the screen from the bottom of the arena, all lit pegs will disappear, and the player is allowed to shoot another ball if there are remaining pegs.
Before the player shoots a new ball, the location of the purple peg is randomised to be another blue peg. That is, the current purple peg, if not hit, changes into a blue peg; a random blue peg in the screen (possibly the previous purple peg) changes into a purple peg.
Free Balls
There are 2 main ways for the player to gain free balls. When the player gains free balls, the number of balls the player has is incremented. There is no maximum limit to the number of balls the player can achieve.
The first way is by catching the ball in the bucket. The bucket is positioned at the bottom of the arena, moving left and right. If the ball enters the bucket, the player is awarded one extra ball.
The second way is by achieving certain score. If in the current ball, the player gets 25,000 points, the player gains one extra ball; 75,000 points give two balls; and 125,000 points give three free balls. The player cannot gain more than three balls in this way.
Scoring System
Base Score
The base score of each peg is as follows:
- Blue peg: 10 points
- Green peg: 10 points
- Orange peg: 100 points
- Purple peg: 500 points
To calculate the base score of a shoot, multiply the sum of the points of each individual peg with the number of pegs hit. For example, if a ball hits 10 blue pegs, 5 orange pegs, and 1 purple peg, the total score is (10 × 10 + 5 × 100 + 1 × 500) × (10 + 5 + 1) = 17,600.
Multipliers
This base score will be multiplied according to how many orange pegs remain:
- No orange pegs left: 100x
- 1 to 3 orange pegs left: 10x
- 4 to 7 orange pegs left: 5x
- 8 to 10 orange pegs left: 3x
- 11 to 15 orange pegs left: 2x
- At least 16 orange pegs left: 1x
The multiplier affects the individual peg scores. For example, suppose the player has a 1x multiplier. The ball hits a blue peg, and then hits an orange peg, changing the multiplier to 2x, before hitting another blue peg and going down. The total score will be (1 × 10 + 1 × 100 + 2 × 10) × 3 = 390.
Style Shots
The player can gain additional points for hitting certain criteria, called style shots. The points gained here do not count towards getting free balls, and it is also not affected by the multiplier.
Here is a non-exhaustive list of style shots.
- Long Shot: from launch, the ball hits a non-blue peg, traverses through at least 1/3 of the screen width, and then hitting another non-blue peg. This is worth 25,000 points.
- Super Long Shot: from launch, the ball hits a non-blue peg, traverses through at least 2/3 of the screen width, and then hitting another non-blue peg. This is worth 50,000 points.
- Double Long Shot: after getting a Long Shot, the ball traverses another 1/3 of the screen width and hits another non-blue peg. This is worth 25,000 points.
- Off the Wall: from launch, the ball hits the wall, then traverses through at least 1/5 of the screen width, and then hitting another non-blue peg. This is worth 25,000 points.
- Lucky Bounce: the ball hits the edge of the bucket repeatedly before entering the bucket. This is worth 25,000 points.
- Kick the Bucket: the ball hits the last remaining orange peg after hitting the edge of the bucket. This is worth 25,000 points.
- Free Ball Skills: the ball hits a peg and gets into the bucket. This is worth 5,000 points.
- Mad Skills: the ball gets into the bucket 5 times in a row. This is worth 25,000 points.
- Crazy Mad Skills: the ball gets into the bucket 10 times in a row. This is worth 100,000 points.
- Cool Clear: clear all pegs, including blue ones. This is worth 25,000 points.
- Double Power-up: hit both green pegs with one ball. This is worth 25,000 points.
Fever Scores
See the section below.
Fever
Once the ball hits the last orange peg, Extreme Fever mode activates. The bucket at the bottom is replaced with 5 buckets side-by-side, with scores, from left to right: 10,000, 50,000, 100,000, 50,000, 10,000. Once the ball goes inside one of the buckets, the respective score is added (without multiplier).
In addition, the game will end, and any remaining balls grants 10,000 points each to the player.
Here is an example of Extreme Fever:
If all pegs are cleared (instead of only orange pegs), Ultra Extreme Fever mode activates, and all the bucket points are replaced with 100,000. Here is an example of Ultra Extreme Fever:
Peggle Masters
At the beginning of the game, you may select a Peggle Master. The Peggle Master determines what power-up you will get when you hit a green peg. For a list of all Peggle masters in the franchise, see this link.