Problem Set 2: Building a Level Designer
| Issue date | Monday, 19 January 2026 |
| Due date | Sunday, 1 February 2026 |
| Total points | 130 points |
- Please read the entire problem set before starting!
- Start early! This problem set is a huge difficulty jump from the previous one. If you are not familiar with Swift, iOS, or UI programming, there is a lot to learn!
Introduction
In this problem set, you will implement a simple application in order to better understand the MV* design pattern, gesture handling, and file operations/persistent storage. We also want you to consider different ways of implementing the requirements for this problem set before you decide on the final implementation.
You will also design and implement a few simple objects. Some specifications will be given, but you will not be given the full set. You are expected to add the appropriate interfaces and specifications to complete the problem set. Please ensure that you also document your code well, for other developers (including your grader) to understand your code better.
At the end of these problem sets, you are given the freedom to customise your game. This is what the best students from previous years have made:
AY20/21
AY19/20
Domain Logic and Presentation Logic
In this problem set, you will want to practice a clean separation between domain logic and presentation logic. The domain logic contains information about the models, while the presentation logic contains information about how the model is presented to the user through the view.
For example, if we are building a chess game, the domain logic contains information about how the chess pieces interact, and the presentation logic contains information about the shapes of the pieces, what color the squares are, whether the king is checked, and so on.
The main purpose of this separation is so that we know that if we change a system in some way, we only need to change a certain part, and we know that it won't break other parts. For example, suppose I want to play a variant of chess where there are 4 bishops instead of 2 knights and 2 bishops; I know that I would only need to change the domain logic, and the presentation logic will correctly adapt to whatever domain logic there is (i.e. we do not need to change the presentation logic at all).
There are several architecture design that implements this, such as what is collectively known as MV*: MVC (Model-View-Controller), MVVM (Model-View-ViewModel), and MVP (Model-View-Presenter). The main differences of these architectures are in how the domain logic and the presentation logic interacts and updates each other. We will not go into detail on what the exact differences among these architecture is -- what is most important is that there is a clear separation between domain logic (the Model) and presentation logic (the View). Besides, these architectures are commonly misdefined anyways.
Peggle
The game that you will be building across this and the next two problem sets is known as Peggle. Peggle was developed by PopCap Games in 2006, and it was quite a big hit back then.
A picture is worth a thousand words, and a video is worth a thousand pictures, so here is a gameplay video that is hopefully worth a million words:
In the game, you have some pegs in the level that are given to you. Some of these pegs are blue, and some are orange. You are given a number of balls. The goal is to use these balls to clear all orange pegs. If you can do so, you will win the game. If you run out of balls before all orange pegs are cleared, you lose the game.
To clear the pegs, you use a cannon given at you at the top of the playing field. You use the cannon to shoot a ball. The ball will bounce around according to the rules of physics: it can bounce off walls or pegs, and there is gravity pulling the ball downwards. If the ball hits a peg, it will light up immediately and will be removed once the ball exits the playing field.
Level Designer
Now that you have understood the rough idea of the game, let us talk about the level designer that you will be building in this problem set (the gameplay part will be implemented in the next problem set). The level designer allows you to create levels by placing pegs on the playing field.
The features of the level designer that you are expected to implement include the following:
- RESET, SAVE and LOAD a game level using the respective buttons
- An object palette from which the user can select the peg color or the erase button
- Tap to place a peg
- Drag to move the pegs around
- Delete pegs from the board via long press / the erase button
Building UI on iOS
There are now two choices for you in designing UI in iOS:
- SwiftUI, introduced in May 2019
- Storyboard, which is the old way of doing things
In CS3217, you have a choice of using either one. Having said that, we recommend you to use Storyboard instead as it has been around for a long time and there are a lot of documentation online. On the other hand, if you would like to try out the newest development tools and features, then you can consider SwiftUI. Although SwiftUI is relatively new, it is a declarative paradigm which simplifies your code a lot and its documentation has also improved over the past year.
However, do note that from the author's personal experience in testing this problem set, he encountered quite a number of functionalities not yet ported over from Storyboard, as well as misleading error messages. In addition, SwiftUI itself is just an abstraction layer over UIKit (the framework powering Storyboard), so having knowledge of Storyboard is always useful when you decide to use SwiftUI in the future.
There are many articles in the internet that you can read to decide better, such as this article and this article.
Layout
As you know, iOS device screens come in all shapes and sizes, sometimes nearly rectangular or not even necessarily rectangular. In order to support as many users as possible, your app is expected to work reasonably well on any iPad screen size. You are not required to make your application support other sizes such as iPhone, iPad Mini, and Apple Watch -- although it will be cool if it does!
If you are using SwiftUI, layout should be handled for you quite well; if you are using Storyboard, the use of Auto Layout to make your UI responsive is highly encouraged when it makes sense, but any other reasonable approaches are accepted. For more information, you can consult guides available in the internet, such as the Apple official docs.
In all applications, you are allowed to enable both portrait and landscape orientations, or you can disable one of them. In this game, you may decide to only implement one of them, or you may decide to implement both orientations. If your game supports a certain orientation, it should be able to display in a way that makes sense; otherwise, marks will be deducted.
Disallowed Libraries
Note that third-party libraries (e.g., RxSwift) are not allowed in your application, with the exception of SQLite.swift for persistence.
In addition, the built-in libraries SpriteKit, UIKit Dynamics, and GameplayKit are also not allowed in your application. Before attempting to use any non-standard libraries, it is always a good idea to clarify with the course facilitators.
In PS3 we will give you a chance to build your own game engine -- it will be fun :]
Part 1: Explain your Design (25 points)
Before you begin, please spend some time understanding the requirements of this problem set. Here are some questions that you might want to consider before you start coding:
- What objects (i.e. structs/classes) do you need to implement?
- Among these objects, what goes to the domain logic and what goes to the presentation logic?
- How will these interact and update each other?
- How do you best organize the code for these objects?
- Are there alternatives?
- How will you add new game objects?
Please browse through the entire problem set to view the entire requirements and come back here once you are done.
If you need hints on how to organise the code properly, you may refer to the appendix.
Developer Guide (15 points)
Please explain how you organised your code for this project in your README.md
file. You should think of this as a developer guide that explains the big
picture of your project. Imagine that a new developer joins your team and helps
you maintain this project; he/she should be able to get up to speed by reading
this documentation and skimming/scanning through the code.
Your grader will depend heavily on your documentation and code. Clarity and ease of understanding your architecture and inter-component interactions without significantly relying on your source code will be critical. Naturally, that will translate to the amount of marks you can obtain.
Note that it is likely that you need to finish writing your application first before you can finish writing your developer guide, as your developer guide probably needs to explain the objects involved in the code. Besides, it is likely that a lot of the code design you do involves speculation, and finishing the application allows you to finalise on a design.
Here are some tips on how to create a great developer guide:
- Explain each of your classes in a structured manner. You might want to start from the bottom layer (i.e. your model), building up to your view.
- Draw a class diagram showing the relationships among your objects. The diagram should indicate relationships, and be visually organised based on the high- level architecture (e.g. maybe objects in your Model group should be in one big box indicating that it is the model, etc.)
- Draw sequence diagrams showing some of the important flows between classes, or you may describe these flows in sentences.
- You may also bring up any design patterns (e.g. Delegate Pattern, Observer Pattern, etc) or paradigms that may provide better understanding of the inter-component interactions.
- You might also want to explain the performance constraints of your application: for example, your application only allows up to 100 pegs on screen at one time before performance degrades.
Note that you do not need to write very long developer guides! Some diagrams and a few paragraphs of explanation might be sufficient in most cases. Try giving the dev guide to your friends and see how well they can understand your code by looking at it and skimming through your code.
Design Considerations (10 points)
In addition, when you are designing your system, you will inevitably run into
several possible implementations, in which you need to choose one among all.
Please write at least 2 such scenarios and explain the trade-offs in the choices
you are making. Afterwards, explain what choices you chose to implement and why.
Put your answers in your README.md.
For example (might not happen to you -- this is just hypothetical!), when
implementing a certain touch gesture, you might decide to use the method foo
instead of bar. Explain what are the advantages and disadvantages of using
foo and bar, and why you decided to go with foo.
Points will be awarded based on the significance of the trade-offs and the quality of your discussion.
Your discussions should be based on engineering trade-offs, rather than UI/UX ones. For example, justifying that "doing this is better UX for the user" is an invalid answer. In addition, the decisions you make should respect the requirements stated, so discussions like "making pegs snap to grid vs placing pegs freely" is invalid as well because it is a requirement that pegs do not snap to a certain grid.
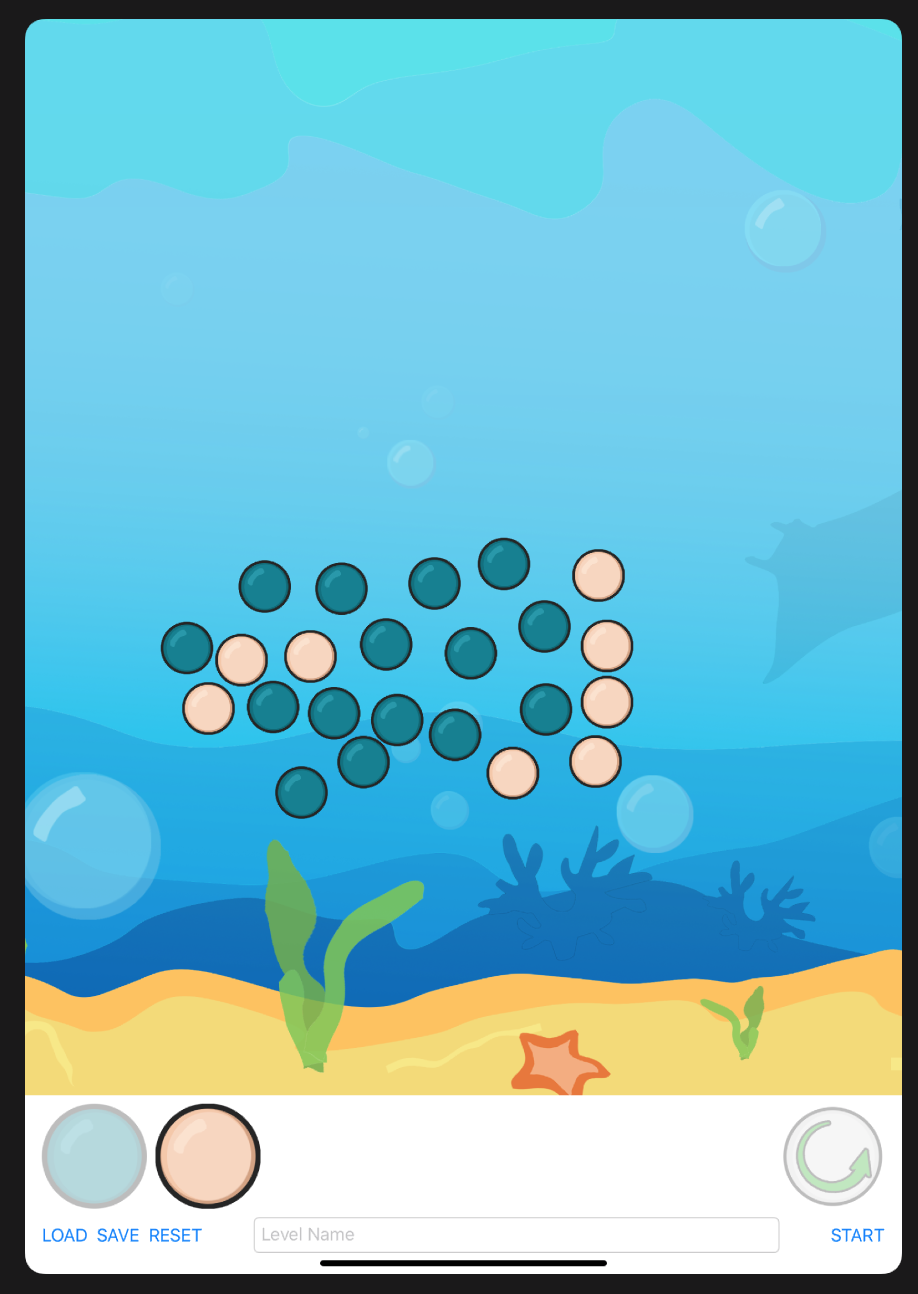
Part 2: The Palette (10 points)
The palette will contain 2 pegs (blue and orange) that the user can choose to fill the board with and an erase button to delete pegs. These images should stay in the palette throughout the design phase. The palette should also indicate the currently selected button (the erase button or one of the 2 pegs).
The following image is a sample screenshot of the level designer. However, you are free to redesign the layout of the level designer as long as you satisfy the basic requirements.
In the starting repository, you are given assets that you may use for these problem sets. You are free to redesign them if you wish; however, we recommend you to focus on making sure you have the functionality right. Towards the end of the half-semester, you are allowed to design your game however you want.
Note: You are reminded once again that your app should display correctly on all iPad screen sizes. Xcode provides a way to preview your UI on various Apple devices.
Part 3: Implementing the Level Designer (45 points)
Now, we are going to create our level designer. These are the functionalities that your level designer should support:
- When a peg is selected, tapping on the screen should create a peg at that location. (10 points)
- When the delete button is selected, tapping on a peg should remove it. (10 points)
- Dragging a peg should move the peg around. (15 points)
- Long pressing on a peg should remove the peg. (10 points)
However, note that at any time:
- No peg should overlap with another peg (i.e. all pegs should be disjoint, and they should not share a common area).
- The pegs may not snap to a certain grid. What this means is that: for every pixel in the screen, the user should be able to place a peg centered at that pixel, provided that it does not overlap with any other pegs.
- The pegs should be within the game area (board). In other words, they should not partially/fully go out of the screen, or overlap with the palette or any other UI components which are not part of the game area.
Do take some time to think about how to implement/enforce the above specifications/constraints. Which part should be under the presentation logic and which part should be under the domain logic?
If you need help, you are encouraged to refer to the appendix again as it has some implementation tips.
Part 4: Action Buttons (10 points)
Now that you have the palette up, let us add these buttons to the level designer:
- START
- LOAD
- SAVE
- RESET
You should make the reset button clear out the board when clicked, and you should implement loading and saving as described in the next part. The START button should not be implemented, as it will only be used in the final problem set; however, it should still be visible on the screen.
Part 5: Persistence (20 points)
Now, you are to implement a way to load and save levels. There are a few ways to do so. In this problem set, we are going to briefly discuss the following three ways:
- Encoding to and decoding from a file
- SQL databases such as SQLite
- Core Data
Please implement the ability to load and save levels, as well as to modify and
re-save a level. Justify your choice of persistence method in your README.md,
by weighing the pros and cons of the persistence methods you have considered.
The user should be able to specify a level name when saving. The user should also be able to specify a level that was previously saved to load. How the user interface for naming levels looks like is entirely up to you.
Note that while your application should work on all iPad sizes, persisted data need not be compatible across sizes. In particular, level data saved from a certain iPad size, when loaded on another iPad size, does not need to be exactly the same level (it does not need to work either).
The persistence functionality is worth 15 points and the justification is worth 5 points.
Encoding and Decoding
You want some way to encode/decode a representation of your model objects. The
easiest way is to make them conform to the
Codable protocol.
Swift encoders take in objects that conform to the Encodable protocol, and the
decoders spout out objects that conform to the Decodable protocol. Swift
itself provides many typical encoding/decoding schemes, such as
property lists
and JSON.
Of course, if you feel that these formats are not good enough, you are free to use other common schemes such as XML, YAML, TOML, HCL, etc. You can even write your own format, if you wish!
Once you have made your objects serialisable/deserialisable, you want to load and save them as files. For that, you can utilise this code:
func getFileURL(from name: String, with extension: String) -> URL {
    let directory = FileManager.default.urls(for: .documentDirectory, in: .userDomainMask)[0]
    return directory.appendingPathComponent(name).appendingPathExtension(extension)
}
You can then use the methods on Data to actually save/load them to/from the
given URL.
SQL Databases
You want to define some schema that represents your structured database. After that, you can do CRUD operations on your database by writing SQL statements.
In the case of SQLite, it is already installed in iOS, so you can use them directly. As typical with other libraries that interface with databases, you are provided with methods to prepare statements, execute them, and process through the results.
For more information, you can refer to existing tutorials such as this one. There are also existing Swift wrappers on the underlying C APIs that you can use, such as this one.
Core Data
Core Data is an ORM (object-relational mapping) toolkit provided by Apple. Similar to using SQL databases, it allows you to define a schema, and read/write data from it. For more information, you can refer to existing tutorials such as this one.
Part 6: Testing (20 points)
Now that you have finished the application, it is time to test it! (If you have decided to go with test-driven development, you would have already written tests as you were implementing the application, in which case you would have no/less work to do here!)
Generally, people write two kinds of tests:
- Unit tests, to ensure correctness in the components.
- Integration tests, to ensure correctness across components.
This is a classic video on what happens when you only have unit tests.
In this problem set, you are going to write a test plan. It may consist of both unit tests and integration tests, or you may also propose your own testing paradigm. Ultimately, you will be awarded full marks if you can ensure that your testing strategy can reasonably guarantee a comprehensive code coverage and the correctness of your code thoroughly. In other words, you should consider all possible scenarios that may occur when a person uses your app.
Unit Tests
Similar to what you did in PS0 and PS1, you should write unit tests to ensure that your logic is correct. In a lot of cases, you do not need to write unit tests for all of your components, as it might be unwieldy. For example, people like to only write unit tests for the model component, leaving the presentation logic to manual testing / end-to-end testing.
As an alternative, you can also give an exposition on how you are going to do your unit tests. For example, you may write them in list format, as follows:
Peg.swiftinitmethod- When passed with
foo, it should initialise with the propertybarset intofoo - When passed with
nil, it should not initialise the struct - ...
- When passed with
- ...
- ...
You would want to cover all possible cases, and in each case, you want to write what happens when the object does something and what is the expected result (note the "should" words above).
Integration Tests
Integration tests are helpful to test that components, which are independently and thoroughly verified, work together correctly.
Developers may write multiple integration test plans that varies in test coverage. A short integration test plan often test for the most common paths, or even the path that does not induce any errors, commonly known as the "happy path". Such tests allows developers to quickly check for any major errors that may potentially disrupt any service that they currently offer. Since these tests are short, they are often executed very frequently.
A longer integration test plan often test for any integration bugs resulted from development errors or incorrect assumptions made by developers prior to shipping to productions. These test plans can be exponentially longer (may even take days to manually verify) due to a wide variety of use case scenarios and user inputs that integration tests and other lower-level tests have to cover. Hence, these massive tests are executed significantly less frequent than "happy path" tests, usually during code merge and code release.
In the case of our problem set, all we care about is your test coverage and the thoroughness of your test plans. Assuming that you that you have a comprehensive lower-level test plan that covers all possible cases, you might not need to write integration tests for all possible cases. However, if you are not confident that your lower-level test plan provide sufficient test coverage, you may consider improving your test coverage when writing integration tests.
There are many ways to write integration tests. One way you can do integration tests is by using the provided UI testing toolkit in Xcode. You can use it to automate your UI tests. For more information, please check the official documentation or the various tutorials available in the internet.
Alternatively, you can also give an exposition on how you are going to do integration tests, just as above. For example, you may write them in list format as well:
- Test palette
- Blue button
- When tapped, it should do
foo - when long pressed, it should do
bar - ...
- When tapped, it should do
- ...
- Blue button
- ...
Just as above, you want to write what happens when the object does something and what is the expected result. Again, note the "should" words.
You may also, for example, give a video on how you are doing your integration testing. Again, you are awarded full marks if the grader is confident that you can write thorough tests for this application.
Late Submission
If you will be submitting/have submitted late for this problem set, please fill up this form so that the latest commit will be graded instead of the last commit that was pushed before the deadline.
Bonus: Reflection (3 points)
Answer the reflection questions in this form for 3 bonus points!
Appendix: Implementing the MV* Pattern in the Level Designer
A correct implementation of the MV* framework has the following properties:
- The model knows about nobody.
- The view knows about the model (but accesses it only through some intermediary).
- The intermediary observes view changes.
- The intermediary updates the model and the view in some way.
Domain Logic
The model should be a standalone component of your application, and it should model the domain logic (in this case, pegs and the board). Hence, in this component, you want to have some object (class/struct/etc.) that models a peg. What exactly this models is up to you: maybe you want this object to encapsulate the location of the peg, or maybe not, for example. It is your job to make sure that everything is clearly encapsulated and is easily extensible. If everything is done properly, you might even be able to carry over these objects to future problem sets without much work!
In the model, you also want to have some way for clients of the model code to manipulate your board. In this board, you should be able to add pegs, remove pegs, etc. that is required by the application.
The purpose of having this model component standalone is so that the domain logic of the game can be decoupled from the rendering logic. For example, if I want to create a web game, I can just take off your model component and build logic to render it as a web application, without modifying your model at all.
Presentation Logic
Again, there are two ways to implement UI in iOS applications: using SwiftUI, or Storyboard. We are going to discuss about the implementation of both.
Storyboard
The easiest way to display your application is by using the Interface Builder provided by Xcode. You can use the Object Library to add various iOS components to your storyboard. For more information on this, you can refer to existing tutorials in the internet, such as the one refered on the tips page.
You can then link these components to your ViewController code, so that you
can interact with them in the ViewController. This interaction includes, for
example, getting the text of an input field; deciding what happens when the user
clicks on a button, such as displaying an alert or passing data to the model;
and so on.
Apart from using storyboards, you can also use the ViewController directly to
create your views. You can utilise the iOS lifecycle, such as the viewDidLoad
method, to prepare things for display. This includes, for example, creating a
new UIView of your palette and displaying it in the screen with the
addSubview method.
This ViewController, then, acts as some sort of the intermediary we mentioned.
There are many ways for this ViewController to control both the model and the
view. For example, the simplest way would be to call the methods exposed by the
model and the view directly. This could work, but one must watch out that
whatever the state of the model in the ViewController is should be on sync
with whatever the ViewController displays to the view. For example, if the
model (that is held by the ViewController) says that there are 3 pegs, the
ViewController should make sure that there are 3 pegs in the screen.
Another way that you can do this is by using some observers. The easiest way to
do this would be to use the didSet keyword on your model. You can supply a
function to this, so that when the model is changed somehow, it will
automatically manage the view. Here is an example to illustrate:
class SomeViewController: UIViewController {
    @IBOutlet private let someView: UIView

    let model: Model {
        didSet {
            someView.doFoo()
        }
    }

    func onTap() {
        model.bar = 'blahblah'
    }
}
The idea here is that, when the user taps the screen, the onTap method is
called which updates the model. The model then will automatically update the
view.
Yet another way is by using the Combine framework, which powers SwiftUI. We leave it to you to read up about what it is.
Finally, you want to make the user interact with your application. For this, you
can use the classes that subclass
UIGestureRecognizer.
SwiftUI
In order to display your application, SwiftUI has provided some starting components that you can use. For example, you can do something like
struct LevelDesignerContentView: View {
    var body: some View {
        VStack {
            Text("One thing")
            Text("Another thing")
        }
    }
}
Here, VStack and Text are some SwiftUI components that you can use by
import SwiftUI.
At one point, you might decide that your view is getting more complex. One of
SwiftUI's advantage is its composability. Generally, it is a good idea to
separate parts of your view into separate SwiftUI structs that you call in
your ContentView.
Now, to implement the intermediary, you first want to have your view components
to have some state in it. With SwiftUI, you are provided with some property
wrappers such as @State, @Binding, @ObservedObject and
@EnvironmentObject. These provides the View struct with access to the single
source of truth, either as a @State in the view itself, or somewhere else in
your model components. You are encouraged to look at the SwiftUI documentation
and other resources to understand more about them and how to use them.
Next, you want to have some way such that when the user interacts with the screen, the state is mutated. To achieve this, SwiftUI provides gestures that you can use in your components. You can pass in a closure which will get called when the gesture is changed or ended.
Apart from that, typical components like Button and TextField are also
interactive, and you can also pass closures to these components to decide what
happens when the user e.g. clicks the button, enters text to the TextField,
etc.
For more information, you are encouraged to follow the official tutorial on SwiftUI that is provided by Apple. We have linked to it on the Tips page.